Sunday, December 29, 2013

Making a Centerpiece

I don't consider myself to be one that is good on flower arrangements.  I've always been a little afraid to even try it. I went shopping at Hobby Lobby the day after Christmas and found these items marked down 66 percent and decided I would at least try.


  I liked this plant because it just looked different and gave it a different texture.  This one was placed in the middle.  I didn't put anything on the bottom of the pail, but just folded the stem to the heigth I wanted it.  It won't stay now, but when the others are added, they will hold this one in place.


Next, I placed the four that were the same into the pail..  Two on each side, one in the front and the other in the back.  Once they were all in, they stayed in place.


It need a little more color, so I bought the two red bows and placed one on each side.


And that was that.  It was very simple to do and I think it looks really nice, if I don't say so myself.  The other great thing is, it cost me less than $12.00.


I also bought the Santa and the Snowman from Hobby Lobby for 66% off.  I bought the Eddie Bauer stocking holders for $3.00 at Goodwill.  One was still in the box.  The stocking were from Goodwill too and I paid $2.00 for each of them.


I know, I need to remove the price tags.


Linking up to these awesome parties:
Tueseday - Nifty Thrifty Tuesday, Take a Look Tuesday, Homemade Tuesdays, One Project At a Time

Setting Up House

Six months ago, we had to move in with one of our daughters, Cassie, because of some unfortunate events.  We sold almost everything we had.  We just moved into a rental home and had hardly anything to put in it.   It just happened to be at the same time the city was having bulk pick up in our area.  Here are some of the things I was able to pick up on the side of the street.


We found this end table.  It needs to be sanded and painted.


We found this awesome chair that is in perfect condition!


 And yes, we found the matching ottoman!


The couch looks new, except for a small hole in the back.  The plan is to cover it.  It has a bed too.  (It looks just like the first couch my husband and I bought, 30 years ago!).  I also found the pillows, which are the colors we are wanting to put in here, so I may keep them.


This piece is perfect for my sewing room!


The dresser is definitely messed up, but with a little loving care, I think it can look great.  This will definitely be one of our first projects!


The chair needs a new cover on it, which I can do.  My grandson, Cooper, loves to sit in this.


We found this beautiful table on the side of the road.  My dearest friend, Judy, and her husband gave us the chairs.  We are planning on painting the table.

The table was a little wobbly, so hubby put screws in it to make it sturdy.


I found this rug and 2 other ones.  I may sell them all and get the one I really want for this room.


So, these are just the items we picked up for the livingroom and sewing room.  Now see how nice these rooms have turned out.  Remember, we would have had nothing for these rooms, except for a few things in the sewing room.


 And the Christmas tree was given to us by my friend, Judy and her husband, too. 


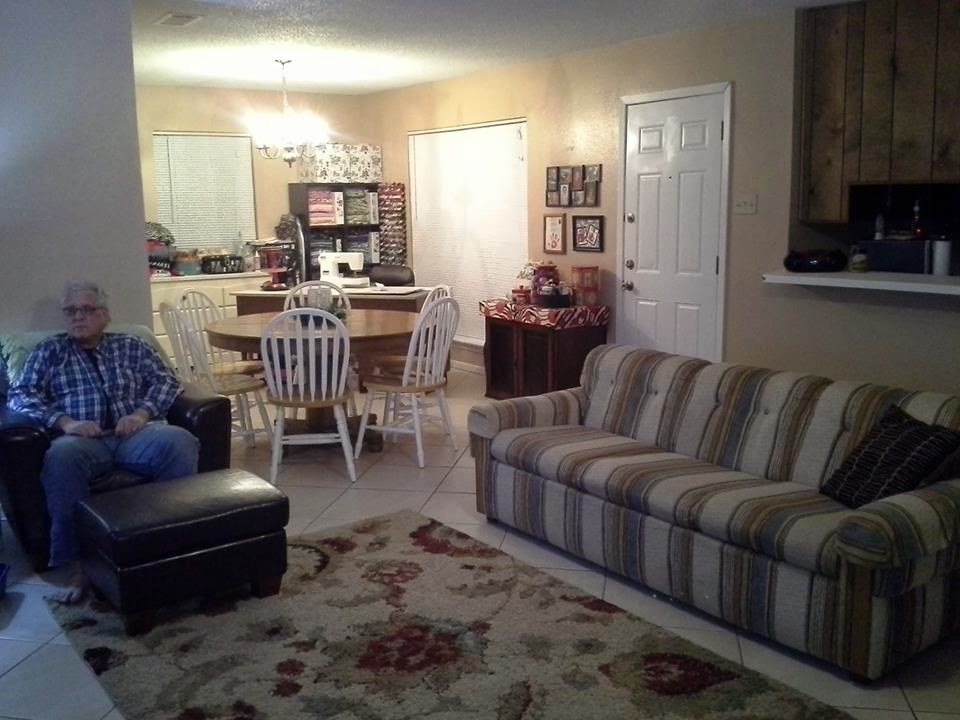
Here's the hubby watching t.v. You can see my beautiful sewing room.


This is the best sewing room I have ever had!  


I love my board and pics, which I made. Maybe I should do a tutorial on those.  I also covered cardboard boxes with contact paper and keep my scraps in them, on top of the shelves.


Windows really need curtains, but it will have to wait a little while. I already have the fabric for them.


Here is my view from my sewing desk.  Once the tree is gone, the t.v. will be moved to the left more.  I have to have a t.v. when I'm sewing.  I can't stand it quiet!  I am also really glad to have it in the diningroom area, where I am not shut away in a room by myself.


So, these are two rooms we have finished.  Working on office, kitchen, utility room, bedroom, and bathroom.  I will be so glad to have them all done!

Sunday, December 8, 2013

How To Get Rid of Mildew Smells


Have you had towels or clothing that have had that horrible mildew smell and you just couldn't get rid of it, no matter how many times you washed them? I know I'm not the only who is guilty of leaving their clothes in the washing machine overnight. Well, I know my niece, Leslie, is anyways. She has been trying for months to get rid of that horrible sour smell in her towels.  She's tried every remedy on pinterest and none of them worked, including vinegar and baking soda!  She was complaining about it (for the hundredth time) to a coworker and the coworker had something else to try. Leslie went home and tried it and has finally gotten rid of the smell! It's simple and now you too can get rid it! So, are you ready to hear what it is?!


Pine Sol. That's right, I said Pine Sol.  Too simple and works great!


 How to:

 Simply add a cap full of Pine Sol to your wash. Let it soak for about an hour and your stinky smells will be gone!  I know some people have complained about that mildew odor in the washing machine as well. I bet if you put some in the washer it would do the same thing.  Give it a try and let me know how it works for you. You could be saving others lives.

Smells be gone!!!

Wednesday, November 27, 2013

Dining Room Makeover

Here's another room in Cassie's house.  The dining room. It had wallpaper in it and Cassie had removed it.  The walls needed major repair and the room was very dark with all the paneling and wood.


We first applied Spackling Paste to all the areas that needed it.  We used a trowel to smooth it out and let it dry.  Once it was dry, we lightly sanded it down. 


Once the walls were dry, we had to prime them.  We applied spackling again to areas that still didn't look right and repeated the same process again.


The blinds had to go!!


Don't the white ones look better?


Once the walls were all done, we painted them a light pinkish mauve.


The paneling and dark doors were what made this room look so dark and closed in, so we wanted to brighten it up by painting them.  We had to sand them all down first.  We used a shop vac to help with keeping the dust down.  It helped quit a bit, since there was so much to sand.


Here is what it looked like after we primed all the wood.


The door and cabinet doors were a dark brown also, so we had to sand them down and prime them too.


We painted the panelling and doors in a white satin.


Here's the final room.


It looks so much bigger and brighter.

This is our next project.  Can't wait to open this space up more and brighten the family room up too.


Saturday, November 2, 2013

Where There's a Will, There's a Way

I went to Goodwill the other day and they had a red Ikea couch in perfect condition for $50.00.  It was perfect for the girls' playing room, so I bought it.


 I told the cashier I needed to go to the grocery store and then would be back.  I asked him if they had rope in the back and he said, "Yeah, they should."  I guess "Should"  should have been my clue.  Of course, when I went to pick it up, they didn't have any rope and it was bigger than I had thought when they put it in my car. It was late, I had just come from the store, and I just wanted to get it and go home.  So, I looked in my car to see if there and anything I could use.  Well, I had two bags of grocery bags that I was intending to take to the grocery store some day.  For once, it was good to procrastinate.  I started tying them together to make a rope.  The two employees that I put it in my car just stood there watching the whole time.  One of them said I was very creative.  I had a heck of a time figuring out how to even attach it to my car, but I did it!  I didn't have to drive that far, so I was just praying I would make it.  Here are pictures of how it looked after I got home.


 It was a lot tighter when I started, so the bags must have stretched out, but, I did make it home. So, it worked!