Showing posts with label painting. Show all posts

Monday, April 7, 2014

My backyard

I have been so busy in the last couple of weeks, cleaning out closets, reorganizing rooms, and lot of DIY.  Unfortunately, most of my projects are not completed yet, so I'm not able to share them.  I've been working on the livingroom.  Everything in our livingroom came from the side of the road during bulk pickup.  I'm now in the process of having it all match. I can't wait to share this with you.

This weekend, I worked on the backyard.  I wish I had taken the before pictures.  The garden area was full of weeds and the bush in the middle took over the entire space.  I also pulled lots and lots of grass in the yard.  This is a rental home, so I just want to do enough to enjoy it this summer.  I planted vegetables in the garden area and added some flowers.  This will be a great space to sit and relax and also to barbecue.


I picked up a few chairs on the side of the road.  They were in good condition, but needed some care.  We had a lot of spray paint in different colors that needed to be used up, so I painted each one of them and they look great.


Here's a table  I found that was in desperate need of being painted. 


You can see the table here.  I painted it to match the two red chairs we already had.  They needed a little touch up and now look great. You can see the overgrown bush in the back.


Here's a bench we are still working on.  I love this because it's so unusual.  It was in major need of sanding.  I'll be posting more on this, when it's completed.


Wish I had more to share right now.  I have one wedding over and starting on another.  My youngest daughter is getting married in November.  So, there is plenty for me to be doing.  In the meantime, I'm going to enjoy my backyard yard when I can.


Wednesday, January 1, 2014

Our Bedroom in Our Last Home


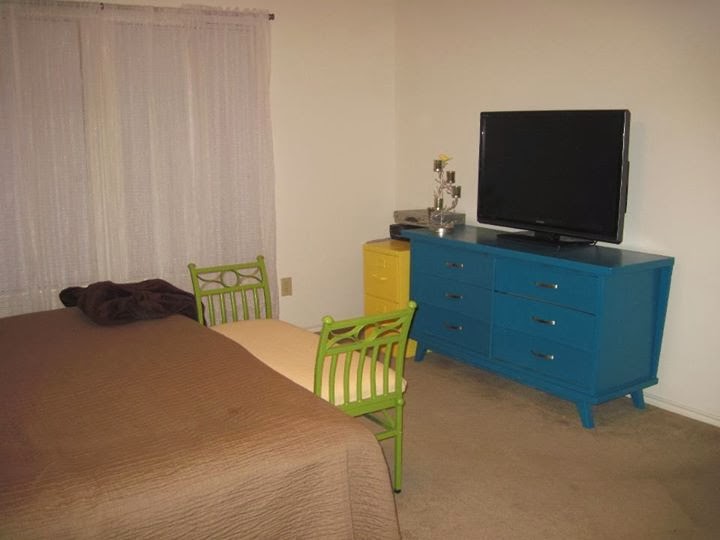
 These are pics from our last home.  I had already painted the dressers before we moved here. 


 I found this sewing machine desk and mirror at Goodwill.  I paid $35.00 for both.  I sanded them and spray painted them yellow.  I also found the lamp at Goodwill for $10.00.  The chair was free.  I spray painted it green, but never got around to reupholstering it.  I made the necklace holder and will do a tutorial on that soon.


I hadn't gotten around to painting the nightstands before we moved.  I love the blue..  I used Valspar Primer, since they aren't real wood.


I lightly sanded them first, wiped them down, and then primed them.


I removed the handles and then spray painted them.  We had to wait several days before putting anything on top of them.  I made the mistake of that once and it will leave an indention on top of furniture.


 I found a metal bench at a garage sale for $10.00.  I spray painted it the same color as one of the dressers and the nightstand.  We already had the foam and fabric.  If we hadn't, I would have waited till it was on sale for 50 percent off, or used a coupon.  I would never buy this at full price, unless I was really desperate.  I used an adhesive spray and placed the large thicker piece of  foam on the wood first.  We had two pieces of foam that were thinner.  I used them on top of the thicker one and had enough of it to wrap around to the bottom.  Then, we placed the fabric under it.  We allowed at least 6 inches extra of  fabric around the frame.


 Using an electric stapler is the way to go!  We folded the fabric over the board tightly and stapled it down.


 And here it is.  It's also very comfortable.


I think it looks great in the room. 


 Did you notice the file cabinet?  I spray painted it yellow to match the room too.  First, I used a spray paint primer and then painted it.  This was very simple to do.


 I just love all the colors together.  Our room feels so homey.


Wednesday, November 27, 2013

Dining Room Makeover

Here's another room in Cassie's house.  The dining room. It had wallpaper in it and Cassie had removed it.  The walls needed major repair and the room was very dark with all the paneling and wood.


We first applied Spackling Paste to all the areas that needed it.  We used a trowel to smooth it out and let it dry.  Once it was dry, we lightly sanded it down. 


Once the walls were dry, we had to prime them.  We applied spackling again to areas that still didn't look right and repeated the same process again.


The blinds had to go!!


Don't the white ones look better?


Once the walls were all done, we painted them a light pinkish mauve.


The paneling and dark doors were what made this room look so dark and closed in, so we wanted to brighten it up by painting them.  We had to sand them all down first.  We used a shop vac to help with keeping the dust down.  It helped quit a bit, since there was so much to sand.


Here is what it looked like after we primed all the wood.


The door and cabinet doors were a dark brown also, so we had to sand them down and prime them too.


We painted the panelling and doors in a white satin.


Here's the final room.


It looks so much bigger and brighter.

This is our next project.  Can't wait to open this space up more and brighten the family room up too.


Friday, October 11, 2013

Painting Around the Toilet

Painting around the toilet can be very difficult, without getting it all over the toilet.  When we painted our bathroom, we used saran wrap to protect the toilet.  This worked really well.  Simply remove the tank top and wrap with saran wrap.


Since then, I found a tutorial from Houseof Hepworths, where she used a garbage bag, instead.

Either way will help protect your toilet from getting paint all over it.  Makes it so much easier!

Sunday, October 6, 2013

Bathroom Makeover, Day 8

Day 8, was not my favorite.  I started to sand the trim in the bathroom, so I could repaint them.  But, because of a poor job done by a painter, I ended up having to scrape off the old paint.  It was just falling off anyways.  Apparently, he put a flat paint over a gloss paint. 


You can see all the paint on my arms.  This was an all day job.  Good thing it was Saturday.  I also got out the electric sander and sand the trim and doors.


Here are my big helpers.  They actually thought it was fun... for awhile.


Once we were finally finished with this, I painted the trim and doors (3 of them) with a high gloss paint.  Now that we have done the doors, the rest of them in the hall need to be done!  I can see how things are going to be escalating!