Sunday, September 24, 2017

How to Make a Banner with Burlap and Fabric


I made several banners for my daughters wedding.  I made some in blue and some in green, since those were her colors. 


I cut out the colored fabric, leaving an inch on each side of the burlap.  I used a cup to round off the edges.  You can make a pattern and then use it for each piece, so they'll all be the same size.   I then cut the other fabric and used wonder under to attach it to the colored fabric. 


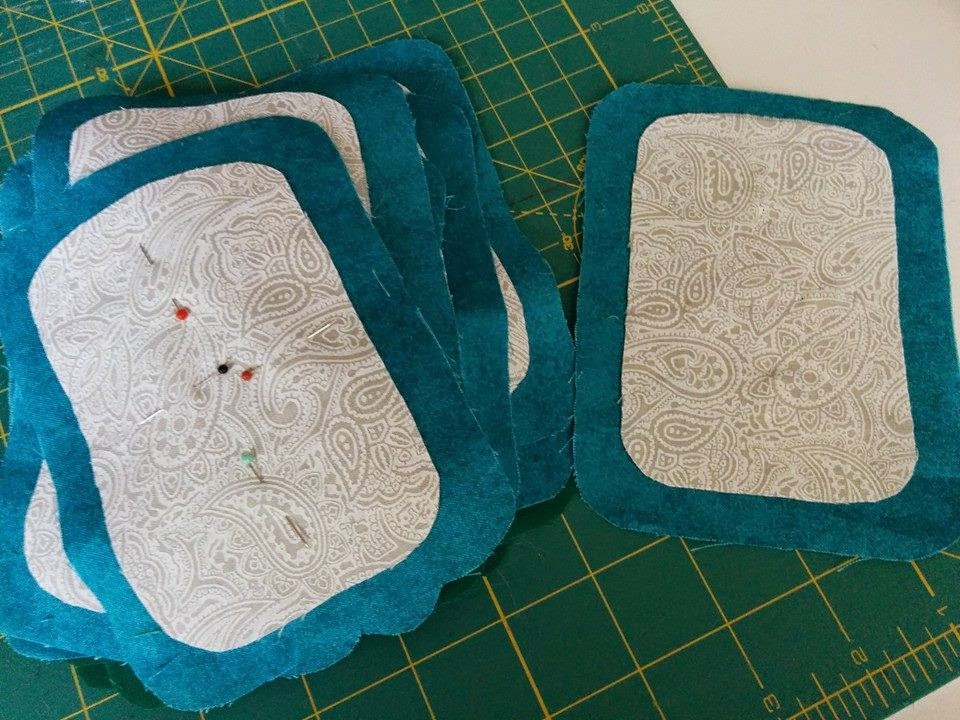
I used a zig zag stitch to attach the fabric. 


I actually drew out my own letters.  I made 9 squares on each paper and then filled them in with the letters I needed.  Using a ruler, it really wasn't hard to do.


I attached the letters with wonder under and then used a zig zag stitch to attach them in the center.
 
 
I added a zig zag stitch to the burlap, to keep it from unraveling.  Then, I folded them over about an inch.   This is where the ribbon or burlap will go through. They just need to be tight enough so they won't move around.


I attached the fabric to the burlap and again used wonder under and the zig zag stitch. 


 I used matching ribbons to hang them. I love the way they came out. Here's a few of the ones I made. I liked having the colored fabric on them.  It just added a little more color for some of the tables.


Saturday, December 6, 2014

Pantry

 
We have moved...again.  Hopefully, this is it for a long, long, time.  I have been spending the last two weeks getting this place together.  My first priority was the kitchen.  It just feels more like home when the kitchen is together.  Mostly, I just wanted to get it organized, but the pantry was so bad I decided to go ahead and paint it before putting anything in it.


This is what it looked like before.  The walls were in bad shape.


 The shelves were awful!


This is behind the bi-fold doors.  They were covered in dust.


The first thing I had to do was just clean it.  I vacuumed up as much of the dust as I
could at first.  Then, I used a sponge with soap and water to clean the rest.


I decided I wanted to paint the shelves grey, so the first thing was to sand everything down.  I don't really like sanding,
but if you want the paint to stick, it's necessary.  Having an electric sander helps.


Here's the color I used. 
 
 
The shelves need to dry for about three days, before you put anything on them.  If you don't, whatever you put on them will leave marks.  I learned this the hard way in the past, so better to be patient.


 My first idea was to put contact paper on the walls.  It was a failed project.  The contact paper didn't stick and I really didn't like the way it looked. 


I decided to paint the walls instead.  I love the blue and grey together.  


Can't wait for the next project.  The bi-fold doors are going!


Sunday, September 14, 2014

Bridal Shower Towel Cake

Yesterday was my daughter's, Mattie's, bridal shower. I've been wanting to make a towel cake for awhile, but was afraid to try it, until yesterday. It ended up being really simple to do and I think it turned out really cute.

 
I first placed a small glass canister with a lid on the bottom of the colander.  Before I did that, I wrapped the canister with one of the kitchen towels that I folded in half.  The top of the towel was about an inch above the canister.  I folded the towel over on the back side of the canister and pinned it down with safety pins.
 
I then placed several of the dish cloths around the canister on the bottom.  I rolled them wrapped two around the bottom of the canister.  Then, I rolled two more up and put them around the first dish cloths I had put in there. It was just enough to fill the bottom of the colander up. 
 
Then, I wrapped the second canister with another of the owl kitchen towels.  Doing the same thing, I folder the towel to fit the canister and then pinned it in the back.  I placed two sided tape on the bottom of it and placed it on top of the other canister.  I tucked it into the towel that was hanging over on the first canister. 
 
I then put a mug on top and taped it down.  The mug had a lid, but I just sat that in the colander.  I placed a couple of dishcloths in the mug, to help hold the utensils I placed in it
 
Once I had the tower built, I just started putting the things I had bought wherever I could tuck them in. 
 
I was actually surprised how easy it was and was very pleased with how it turned out.


Wednesday, August 13, 2014

Coffee Table Makeover


Several months ago, I went around picking up furniture that had been left on the curb
during bulk pickup.  Here's a picture of the truck, full of my treasures. 


In the middle of this picture is the coffee table I found.


This is what the table looked like.  I had to completely sand the entire table.
 (Not one of my favorite things to do, but I was thankful to have an electric sander.)


Next, I wiped it completely down and then spray painted it black.  I put several
coats of black paint on the top.


I decided it needed a little more pizzazz, so I to painted the bottom half red, since our  main colors are red and black.  I used painters tape around the top edge to cover the black top and spray painted the bottom with red spray paint.  Again, I did several coats. I waited a few days, to make sure the paint as completely dry before putting it back in the living room. 


 I waited several days before putting anything on the top of it. I made the mistake of doing
that once  too early and it left indentions.  So, now I'm extra careful  about it.

And here it is.  I love the two toned look.  What do you think?


Friday, June 27, 2014

Remake for a Kitchen Hutch


We have been living in a rental home for the last several months.  The kitchen is short on cabinet space.  Here is our solution.
 
I found this beaten up dresser when the city was doing bulk pick up in our area.  The top was missing and so was one of
the drawers.  A couple of the drawers were messed up.  It was in really bad shape.


I also found this piece on a curb. 


We had a table we had picked up and used the top of it for the dresser.  My hubby 
cut it in half.  He also made shelves for inside for the top two dresser drawers.


Here, we had to glue the slider for the drawer back in place.


Our main color in the kitchen is red.  I wanted to paint it red and make it look old. First, I had to
lightly sand down all the pieces.  Next, I spray painted all the pieces with black  spray paint. Once
it was dry, I spray painted them with red.  I used Rustoleum Ultra  Cover 2X, Colonial  Red, Satin.


To paint the drawers, I used double sided tape and covered the inside of the drawers with
newspaper. I sprayed them with black spray paint first, and then the red.


Once all the pieces were dry, I started sanding it.  I sanded some areas so that the black was showing.  I used a
smooth sandpaper when doing this; otherwise, it looks scratched up.  It takes a little longer, but is worth it.


I cleaned the handles with soap and water to remove dust and dirt.   After they were completely
dry (this is important or you will end up with bubbles), I placed them on newspaper and primed them.  
Once the primer was dry, I spray painted them black.


I searched everywhere for the right size baskets and finally found them at HEB for $1.39 each.  I spray
painted them black and they are perfect.   I also love how the drawers came out. 


And here's how it looks.  I'm really pleased with it.