Tuesday, January 28, 2014

Tutorial for Making Food Trays

I made several trays for my daughter's Bridal Shower.  Making your own serving trays is easy and very inexpensive.  I saw a two layered tray in a store for $25.00 and I made mine for around $10.00 each.

This tray was made with two china plates, a glass serving plate on the bottom, a glass bowl on top, and
two candlesticks, that I bought from thrift stores.. I spray painted the candlesticks with a glitter paint.  To stick them all together, I used a glue called Goop.  You simply apply it to both dishes, where you want to attach them, and then wait 3 minutes before putting them together.  It holds very well. I love this tray and
it cost me less than $10.00.

 Here's the fruit tray with fruit and dip.  They were all so much prettier once the food was added. This one makes me really hungry.  The dip is awesome.  You can check out the recipe here


Here's another stand I made.  This was for the cupcakes.  Again, I used a glass serving plate 
at the bottom, a regular plate in the middle, and a white glass bowl on top.  I used wooden 
candlesticks and painted them white.  This one cost me about  $8.00.

  Here's the cupcake stand with the cupcakes.  See how much prettier it looks?
  
 Here's one I made for the pancake stacks.  I paid about $6.00 for this one.  It was just a glass 
serving bowl on the bottom, a large candlestick, and a small glass serving plate on top.


The pancake stacks came out so cute! See how easy they are to make over here

 Something else I did, was to put candlesticks on some of the bowls, in different heights.  
I think it looks so much prettier than just all of them being the same.

 I love the way all of these trays came out and they were so easy to make.  I think they are prettier than the $25.00 little ones I saw in the store.  You can get so creative making these.  I bought all the dishes and candlesticks at thrift stores.  I bought the little cupcake in this last picture at a thrift store too and painted it to match the colors of the bridal shower.  You never know what you will find, that can become a treasure.

So, go ahead, and give it a try!


Pancakes on Skewers

When we gave my daughter a bridal shower, we decided to do a brunch.  We had seen some cute ideas on pinterest and decided to make pancakes on skewers.

To make them easy, we used tiny frozen pancakes, placed a skewer in them, and added fruit on the top.  They came out so cute!


Yummy Fruit Dip

This dip is so easy to make and is so delicious!

All you need is two ingredients:  Cream Cheese and Marshmallow Puff.


Just mix the two together in equal parts.  Your family and guest won't be able to get enough of it.  Neither will you!

Look how beautiful it looks in this tray too.


If you want to know how to make a similar tray, please check out my tutorial over here.


Sunday, January 5, 2014

Upgraded File Cabinet

We moved in to our home a couple of weeks ago and had very little furniture.  I'm working on my office right, which had no furniture, except for two orange seating chairs, a desk chair, and 2 lamps.  I found a large file cabinet at Goodwill for $15.00.  It's very large and very sturdy, which is great for storing my vintage dishes in.  Only problem is, it's ugly.


Here is is at my home.


I am trying to fix our house up, with spending as little as possible.  I went thru everything I have and came up with an idea to decorate it.  I have a lot of white wrapping paper from the dishes I buy.  I decided to try and use them.  I made a flour and paste mixture first.  I crumbled the paper up and then tore the paper so there was no straight lines.


 Next, I brushed the flour and water mixture onto the paper with a paint brush. 


 I started at the top of each drawer.  To get the crinkled look, I put it on loose.  You can see this better in the next picture after this one.  I patted it down with the palm of my hand.  Don't worry if you tear it, you can either push the paper up to cover the hole or add another piece.


This is how it looked after it started drying.  While it was drying, I took the handles and scrubbed them down before I put a metal primer on them.


I decided I wanted it to have some color, so I started looking into what I had.  I found some tissue gift wrap that I thought would look good.  I cut 4 squares, a little larger than the size of the doors.


 I applied the flour and water mixture to the back of each panel and then placed it over each drawer.  I folded the ends in all the way around.  Once they were all dry, I sprayed them with several coats of lacquer.  I think this will give it more durability.  While the drawers were out, I scrubbed this humongous thing down.  It really needed it.


And here it is, after the knobs were painted as well.


 I am very pleased with it.  I think it looks so much better than it did before.  Please feel free to ask questions in the comment box.  I look forward to hearing from you.


Tortilla Soup

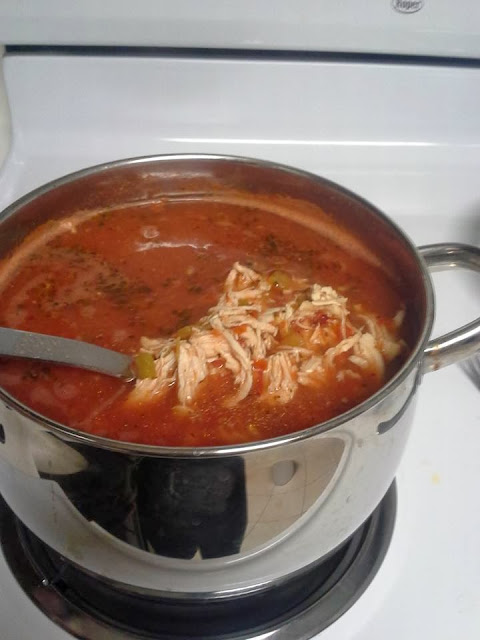
I made the best tortilla soup tonight and have to share it with you.  It's good, easy to make and great for these cold days.


Ingregients:
4 chicken breast
1 large can of tomatoes (whatever kind you like)
1 can chilies
Garlic
Seasoning Salt (I use a no salt seasoning)
Grated Cheese (I used a Fiesta Blend)
Tortilla Chips


Directions:
Boil the chicken first.  When done, save about 3 cups of the broth.  Let the chicken cool down a little and chop into smaller pieces.
Place broth and chicken back into pan and start heating it up.  Add water, canned tomatoes, chilies, garlic and seasoning salt.
Cook till boiling and then simmer as long as you like.

Add as much cheese and tortilla chips to your bowl of soup and you are ready for a treat!

This will feed about 6 to 8 people.  It's even better the next day, so make more if you want.


Saturday, January 4, 2014

One Man's Junk, Another Man's Treasure

I am one of those people you see digging through people's "garbage" they have left on the curb for bulk pick up.  I have found so many things for our home this way.  During the last couple of weeks, I've been getting a lot of things, since we just moved and are trying to furnish our home.


 I had to talk hubby into this one.  This is going to be my new entertainment center, after he fixes the legs.


If you go to one of my other post, Setting Up House, you can see some of the other things we have found that are already in our home.
I am looking so forward to being able to share our projects with you this year.


Wednesday, January 1, 2014

Our Bedroom in Our Last Home


 These are pics from our last home.  I had already painted the dressers before we moved here. 


 I found this sewing machine desk and mirror at Goodwill.  I paid $35.00 for both.  I sanded them and spray painted them yellow.  I also found the lamp at Goodwill for $10.00.  The chair was free.  I spray painted it green, but never got around to reupholstering it.  I made the necklace holder and will do a tutorial on that soon.


I hadn't gotten around to painting the nightstands before we moved.  I love the blue..  I used Valspar Primer, since they aren't real wood.


I lightly sanded them first, wiped them down, and then primed them.


I removed the handles and then spray painted them.  We had to wait several days before putting anything on top of them.  I made the mistake of that once and it will leave an indention on top of furniture.


 I found a metal bench at a garage sale for $10.00.  I spray painted it the same color as one of the dressers and the nightstand.  We already had the foam and fabric.  If we hadn't, I would have waited till it was on sale for 50 percent off, or used a coupon.  I would never buy this at full price, unless I was really desperate.  I used an adhesive spray and placed the large thicker piece of  foam on the wood first.  We had two pieces of foam that were thinner.  I used them on top of the thicker one and had enough of it to wrap around to the bottom.  Then, we placed the fabric under it.  We allowed at least 6 inches extra of  fabric around the frame.


 Using an electric stapler is the way to go!  We folded the fabric over the board tightly and stapled it down.


 And here it is.  It's also very comfortable.


I think it looks great in the room. 


 Did you notice the file cabinet?  I spray painted it yellow to match the room too.  First, I used a spray paint primer and then painted it.  This was very simple to do.


 I just love all the colors together.  Our room feels so homey.