Sunday, March 9, 2014

Preparing for a Wedding - Part 1


It seems like years ago, since we started making plans for my daughter, Cassie's, wedding.  Actually, it was about 9 months ago.

There are so many steps to preparing for this big event and it can become quite overwhelming at times.  There were several times when we would have to put it away for a few days.

Just knowing where to start and how to go about it can help, so I have made a list of the things we did to get ready for that big day.

Step 1:  How big of a wedding will you have?  Find out how many groomsmen their will be and how many bridesmaids you are looking at.  What will your budget be?  Cassie had 4 bridesmaids and a maid of honor.  There were 6 groomsmen, which worked out well, since her two daughters were in it too.  Also, start working on your guest list.  This will help to decided where this great event will take place and will also help in determining what your budget will be.


Step 2:  You will need to decide on where the wedding and reception will be.  You need to reserve your date as soon as you can, in order to make sure that date will be open.  Venues are booked way ahead, so if you want to have a guarantee on your date, you need to do this at least 6 months in advance. Prices vary so much, so try and find the one that will fit with your budget best and that you will be happy with.

Step 3:  Once that is out of the way, the dress is next.  Everything else revolves around the dress and the venue.  Here is the dress Cassie picked out.  Wait till you see her at the wedding.  She was so beautiful!


Step 4 - Choose your colors.  What color will your bridesmaid dresses be?  Cassie chose silver, purple and pink for her colors.  She decided on purple for the bridesmaid's dresses.  We had a palette of her colors and added this to our notebook.

Step 5 - Pick out your bridesmaids dresses.  Give your bridesmaids plenty of time to order their dresses and have them altered. (Not that this always helps.  You might have a few that will need to place rush orders, but just stay on top of them or have your Maid of Honor do this).

Step 6 - Pick out the caterer.  Decide if you want to have a buffet or a sit down dinner.  Check out several places and see if you can try their food before deciding.


Step 7 - Think of who else you will need to hire.  You may not know all of this yet, but at least you will have it written down and be reminded to check on it.  Here was our list:
              DJ - Jose'
              Flowers and tablecloths - Ashley
              Cake - Creations Cake
              Caterer - We Got it Covered
              Photo Booth -
              Photographer - Dunks Photography
              Cassie's Hair - Johnny
              Makeup and Hair - Stefanie
              Groom's Cake - Stephanie

Step 8 - The Planning.  We both put together a notebook with ideas in it.  We went on pinterest for ideas and some I copied over and placed in our notebooks.  This will be for the ceremony and reception.  Good thing about this step is you can always add or take away.  Trust me, you will change things.

We first went thru the tables she would have at the reception and ceremony.  Here are the tables we had ( I had a page for each one in the notebook):
1)Gift Table
2) Photo Booth Table
3)Cake Table
4) Candy Table;
5)Guest Tables;
6)Bride and Groom Table

We broke each one of the tables down:

1) GIFT TABLE - The gift table would need a card box and a centerpiece. She wanted the kids to have something to do during the wedding and had an activity pail for them (This changed several times).   The gift table was outside at first during the ceremony.  When it was brought in, the kids pails were placed on the table, along with a sign for kids 10 and under to take one.  We also had a sign added to let guest know we would be sending them off at 11:30, with sparklers.  The sparklers were then placed next to the table in a big purple, glittered pail that had sand in it.  The sand was for after the sparklers had been lit.  The used sparklers would be placed in the sand, so we wouldn't have to worry about trashcans catching on fire.


We found small silver pails.  I spray painted them with silver glitter.  We put suckers, and neon necklaces in them.  We made an Activity Book, which had their name and date on it.  There are plenty of coloring pages you can google and print.


  2) PHOTO BOOTH TABLE  - Cassie wanted this to be where everyone signed in, so she needed black paper, pens, and glue for this table.  We also had extra props, paper and scissors.

 We ended up not putting the book out, but just the pages for them to glue their pictures on and sign.  And yes, those silver and purple things are glue sticks.  I painted the tops of them with purple paint and spray painted the other have with silver glitter paint.


 3) Cake Table - We needed to buy the cake cutter and server for this table.  We went to a bridal show and decided on which cake company we liked the best.  By signing up with them then, we got a discount on the cake.  We had to make the cake stand.  You can see the tutorial of that here.


The cake was so beautiful and tasted great!


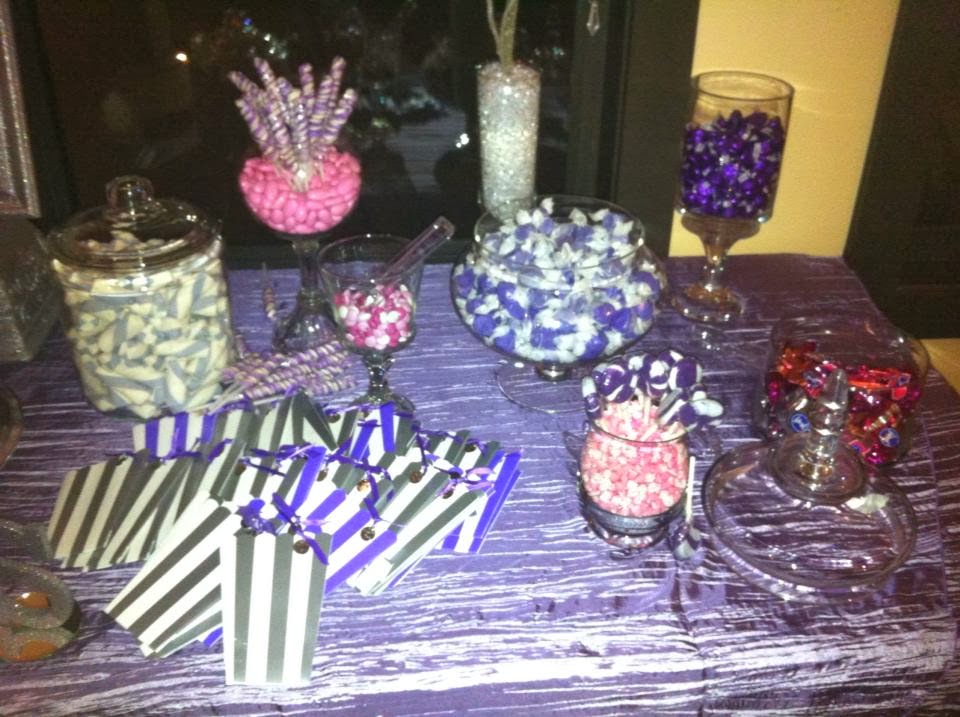
4) CANDY TABLE - This was one of the more difficult tables.  I have a POST just for setting this table up.  I also have another POST for measuring candy to vases.


5) GUEST TABLES - Centerpieces are a big part of the planning.  Cassie changed this a few times, I think.  We were going to rent them, but then with the Christmas sales, it was cheaper to do it ourselves.  She had a wintery feel to her wedding, so she used wreaths that were 70% off for centerpieces and hot glued the flowers and pine cones on, which were also on sale.  We placed mirrors underneath them.  I bought vases at thrift stores and we had branches in them with crystals hanging from them.  We bought the crystals from Hobby Lobby when they were 50% off.


6) BRIDE AND GROOM TABLE - Cassie wanted a smaller rectangle table for them.  We put smaller centerpieces on each side, with two candles on each.  We also made signs for the Bride and Groom chairs.


Keep coming back for more post on preparing for the wedding. Go here for Part 2.


Saturday, March 8, 2014

How to Make a Cake Stand


When planning our daughter, Cassie's wedding, we were looking for a cake stand.  They are very expensive, so we decided to come up with our own.  I found the styrofoam at a cake supply store.  I paid around $15.00 for it.  I had to order the mirror on line, since it was about $30.00 with shipping.  The bling was around $8.00, so it cost a little less than $55.00 to make it.

 This comes in a roll.  I think I got it from Michaels.  We just cut it the width of the styrofoam.


I don't have pictures of it, but we just glued the mirror onto the top of the styrofoam with a wood glue. You need to be careful what kind of glue you use on styrofoam.  We cut the bling down to fit the styrofoam and then put glue all the way around the side of the styrofoam.  We added the bling, and put straight pins in to hold it together.


Place straight pens on the other end, once it is done.


And here it is:


Friday, March 7, 2014

The Bachelorette Party

Cassie's bachelorette party, started off at Stone Werks in our little black dresses.  This was great because I got to go with them.

This is Cassie.  She looks so beautiful with her purple hair.  Love the kitty hose!


 Here are the bridesmaid and her second mom, my best friend.


 As the girls were walking in the front door of the restaurant, a little boy was just starring at them. 
 His mother turned him around.  How cute!


And this is me.  I had a blast having an excuse to get dressed up.


Me, my oldest daughter, Shayla, and Judy


 Megan, Cassie and my other daughter, Mattie


 My niece, Leslie, and my friend, Judy


Here's her cake.


After dinner, the girls went out for awhile and then headed back to the house for a sleepover.


 Guess you are never too old for footsie pajamas (even when you are getting ready to get married).


Thursday, March 6, 2014

How to Prepare a Candy Table


I created this table for my daughter's wedding.

Of course, the first thing you need to know is your colors.  Her colors for the wedding were purple, silver and a touch of pink.  So, I knew these would be the colors we would use.

If you are looking for an inexpensive way to do this, then you have come to the right place.  I spent many trips to thrift stores first.  I was able to find some really nice vases at very reasonable prices.  I really hit the jack pot with several of the bigger ones.  I only paid $4.00 to $5.00 for each.  I know several of these would cost $40.00 in the store.


Some of the smaller ones, I added candlesticks to them to give them height.  I used gorilla glue and they held together very well. 


  Next, I started pricing candy online.  I bought candy from a couple of places.  Oriental Trading had the taffy for the cheapest and the almonds, which were still expensive.  They had pink and purple almonds, so I bought two pounds of each.  I bought the candy canes, sixlets, and suckers from Party City.  You can look for coupons on line for Party City.  Candywarehouse.com had the other suckers, taffy, hershey kisses, lemon drops and pink mints.

I went thru each one of these sites and pasted pictures of the items I wanted.  Then I printed them.  I set up a table with the vases I had at the time and placed everything where I thought I wanted them.  I taped the pictures of the candy to the vases.
The water bottles in the back represent the letters "SWEET".  I had to add a smaller table on the left, to make the table the right size.  Anyways, this helped me visualize what it would look like.  We did end up changing a few things, but it still helped.  Since I was able to find larger vases, some of the vases changed.


The hardest part was knowing how much candy to get for each vase.  I searched several sites to try and figure this out.  I have listed each jar and candy over here to try and make it easier for you. 

Next, I wanted to give the table dimension.  I did so by having different sizes of vases; along with adding suckers to some of them.  Besides, the suckers just made it look cute!


When I had all the candy and vases, I set them up on the table again.  My daughter had decided to have the letters, "SWEET", up in the front.  We changed the location of the sign and added two of the centerpiece branches.    After I had it the way we wanted it, I took pictures and made copies of them.  I placed them in the bins, so I could look at them when setting up.  This was VERY helpful!  You definitely want to do this.

 Left Side

 Middle

Right Side 


Here are the candy bags we used.  They were purple and silver.   We added little charms that I got from OrientalTrading.com that said "Thank You".  We used a single hole punch to make the holes and tied them on with purple ribbon.


We bought cork letters that spelled out "SWEETS".  I spray painted them with silver glitter paint, which was used for everything in her wedding.  I bought tiny mirrors from Michaels.  We didn't glue them together, until we set everything up.  I was afraid they would get messed up before then.


 We added the groom's cake to this table as well.  The song from Paramore, "Still Into You", was their theme.  They actually recorded this song with both of them singing.  I was so proud of her!


It took about 5 bins to pack up all the candy and the vases.  I wrapped each vase pretty good, so they wouldn't get broke.  You can see the copies of the pages I made in the first bin.


  The table was beautiful!